


Create and Use Custom Agents
Create and Use Custom Agents
Custom Agents are AI-powered virtual members of your Expensify account that can take actions based on instructions you provide. You write natural-language instructions that tell an agent what to do, and you can chat with an agent or Copilot into its account at any time.
Each Custom Agent has its own Expensify account with a profile, display name, and instructions you control.
Expensify also supports Agent Rules, which are workspace-level AI automations enforced by RuleBot. Learn how to Create Agent Rules.
Who can use Custom Agents
Custom Agents are currently available through an open beta program. If you’d like to try Custom Agents and provide feedback, contact Concierge to request access.
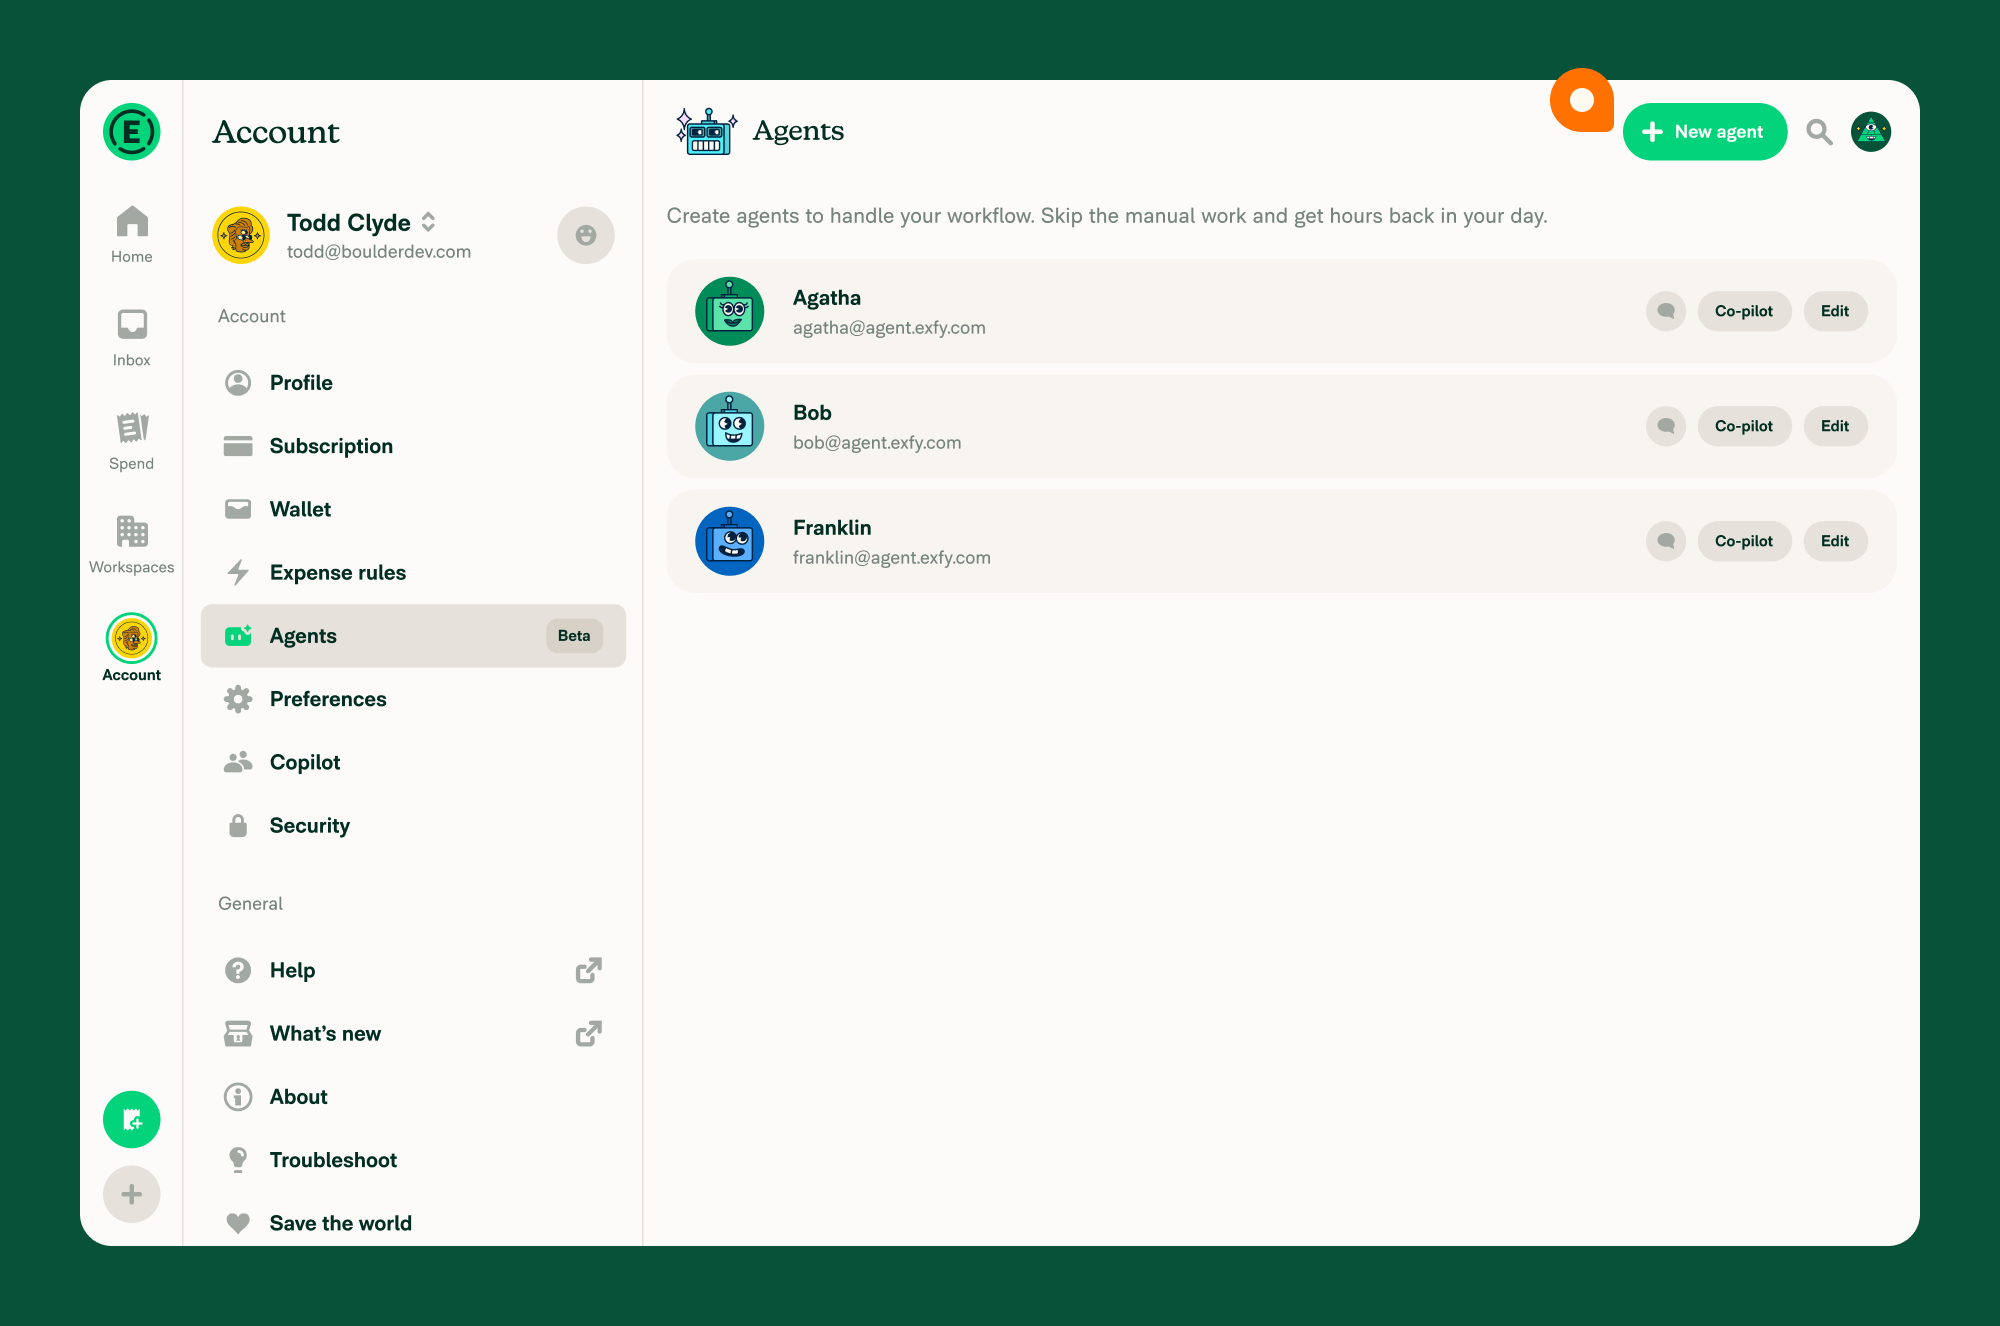
If the beta is enabled on your account, you can create a Custom Agent. When the feature is available to you, an Agents option appears in your Account settings with a Beta badge.
If you don’t see Agents in your Account settings, the Beta isn’t enabled on your account yet.
How to create a Custom Agent
- In the navigation tabs (on the left on web, on the bottom on mobile), click Account.
- Click Agents.
- Click New agent.
- Review the auto-generated profile image and display name. If needed, you can edit these later.
- Click Write custom instructions and describe what you want the agent to do.
- Click Create agent.
After saving, the new agent appears in your Agents list with Edit, Chat, and Copilot buttons.
What happens after you create a Custom Agent
After you create a Custom Agent:
- A new Expensify account is created for the agent.
- You become the agent’s owner.
- You’re automatically added as a full-access Copilot on the agent’s account.
- The agent appears in your Agents list, where you can chat with it, edit its instructions, or Copilot into its account.
- The agent can be added to workspaces as a member and selected anywhere a workspace member can be chosen, such as approval workflows.
How to write instructions for a Custom Agent
Agent instructions are written in natural language. Describe the role, responsibilities, and decisions you want the agent to make. Clear, specific instructions generally produce more predictable results than broad or ambiguous instructions.
If you’re unsure how to write instructions, you can chat with the agent and describe the outcome you want. The agent can ask clarifying questions, help draft instructions, and explain how it would behave in a specific situation based on the instructions.
Custom Agent instructions use the same natural-language prompting concepts as Agent Rules. For guidance, examples, and prompt-writing best practices, learn how to write Agent Rules.
How to chat with a Custom Agent
To open a direct conversation with a Custom Agent:
- In the navigation tabs (on the left on web, on the bottom on mobile), click Account.
- Click Agents.
- Find the agent you want to message, then click the chat icon on the agent’s row.
How to Copilot into a Custom Agent’s account
Each Custom Agent is its own Expensify account with a profile, inbox, chats, and activity history. When you create a Custom Agent, you become its owner and are automatically added as a full-access Copilot.
Use Copilot to see what the agent has done, review its activity, and inspect any actions it has taken on reports.
- In the navigation tabs (on the left on web, on the bottom on mobile), click Account.
- Click Agents.
- Find the agent in the list and click Copilot.
How to edit a Custom Agent’s instructions
You can edit a Custom Agent’s instructions at any time.
- In the navigation tabs (on the left on web, on the bottom on mobile), click Account.
- Click Agents.
- Find the agent you want to change, then click Edit.
- Click the Write custom instructions section.
- Enter the new instructions you want the agent to follow.
- Click Save.
How to delete a Custom Agent
Deleting a Custom Agent closes its Expensify account.
- In the navigation tabs (on the left on web, on the bottom on mobile), click Account.
- Click Agents.
- Find the agent you want to remove, then click Edit.
- Click Delete agent.
- Confirm the deletion.
Deleting an agent can’t be undone.
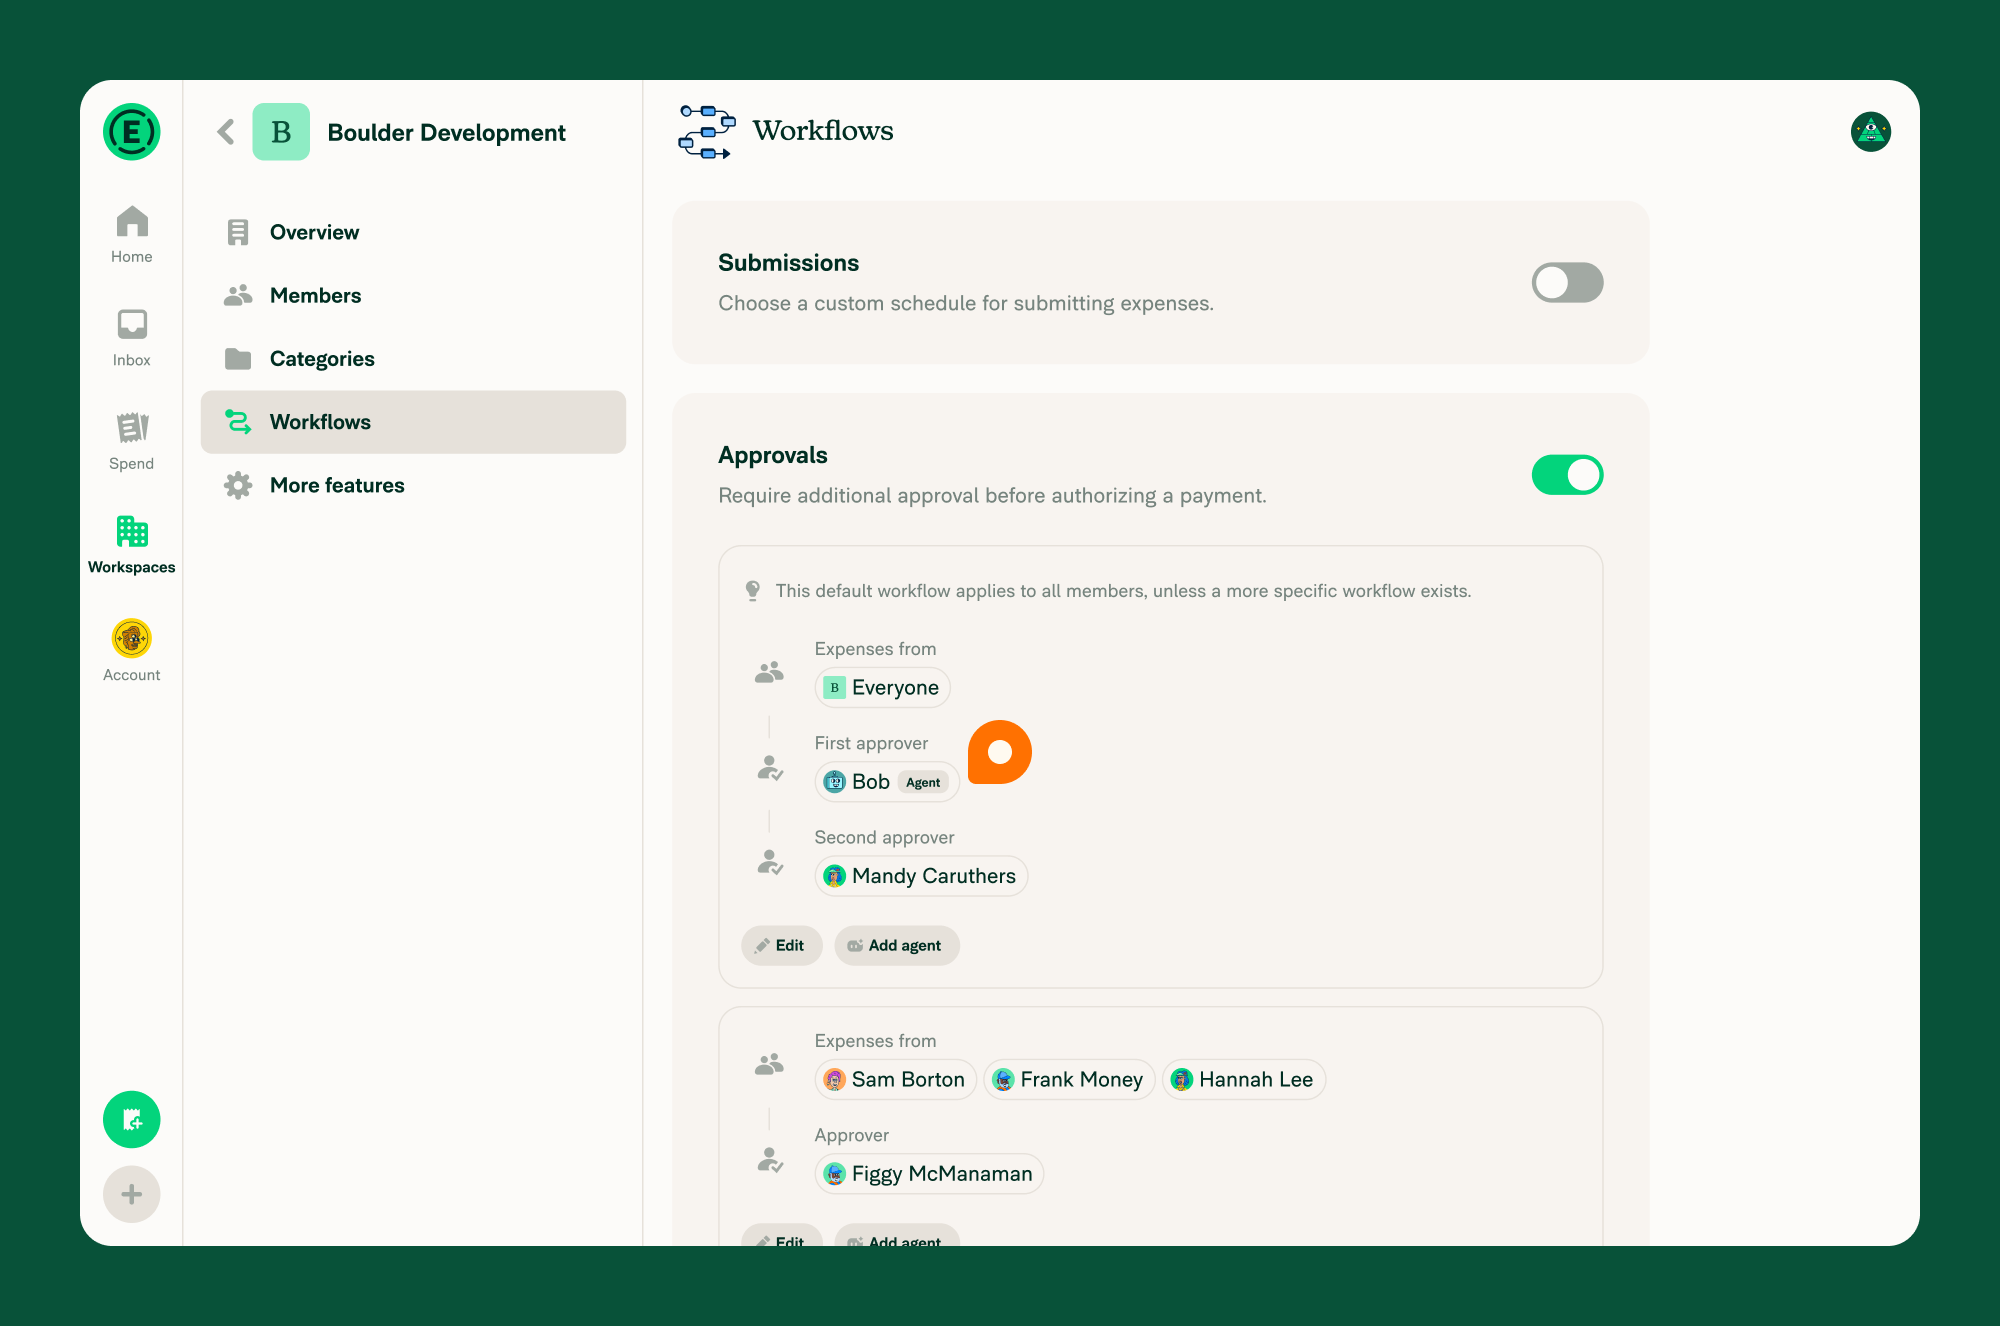
How to use a Custom Agent as a workspace approver
Before you can select a Custom Agent as an approver, the agent must be added to the workspace as a member. Once added, the agent can be selected anywhere an approver can be selected.
Learn how to add a new Workspace member.
- In the navigation tabs (on the left on web, and at the bottom on mobile), click Workspaces > [Workspace name].
- Click Workflows.
- Open the workflow you want to edit, or click Add approval workflow to create a new one.
- Click Approver.
- Choose the agent from the list of workspace members.
- Click Save.
The agent will receive each report submitted through the workflow and determine whether to approve or reject it based on its instructions.
For details on configuring approval workflows generally, see Learn how to add approvals to a workspace.
FAQ
Why can’t I see Agents in my Account settings?
Custom Agents are in Beta and may not be enabled on your account yet. When the feature is available, an Agents option appears in your Account settings with a Beta badge.
Who can edit or delete a Custom Agent?
Only the agent’s owner can edit its instructions or delete it. The owner is the account that created the agent.
Does a Custom Agent have its own Expensify account?
Yes. Each Custom Agent is created as a separate Expensify account with its own profile, inbox, chats, and activity history. The account that creates the agent becomes its owner and is automatically added as a full-access Copilot.
Are Custom Agents billed?
An agent is a member of any workspace it’s added to and is billed as a workspace member like any other member. Usage-based billing for agent activity is not yet in effect at this release.
Can I remove myself as a Copilot from a Custom Agent I created?
No. The owner is permanently added as a full-access Copilot on the agent’s account so you always retain access to review and update the agent.
Can a Custom Agent be added to multiple workspaces?
Yes. An agent is a member like any other and can be added to as many workspaces as you’d like, and selected as an approver in each of their workflows.
Can I use a Custom Agent in multi-step approval workflows?
Yes. On Control plans, Custom Agents can be used anywhere an approver can be selected, including multi-step approval workflows.
On Collect plans, workspaces support a single approver. A Custom Agent can be used as that approver.
Can a Custom Agent make mistakes?
Yes. Custom Agents follow natural-language instructions and are powered by AI, so they may occasionally behave unexpectedly. Write clear, specific instructions and review what an agent does.